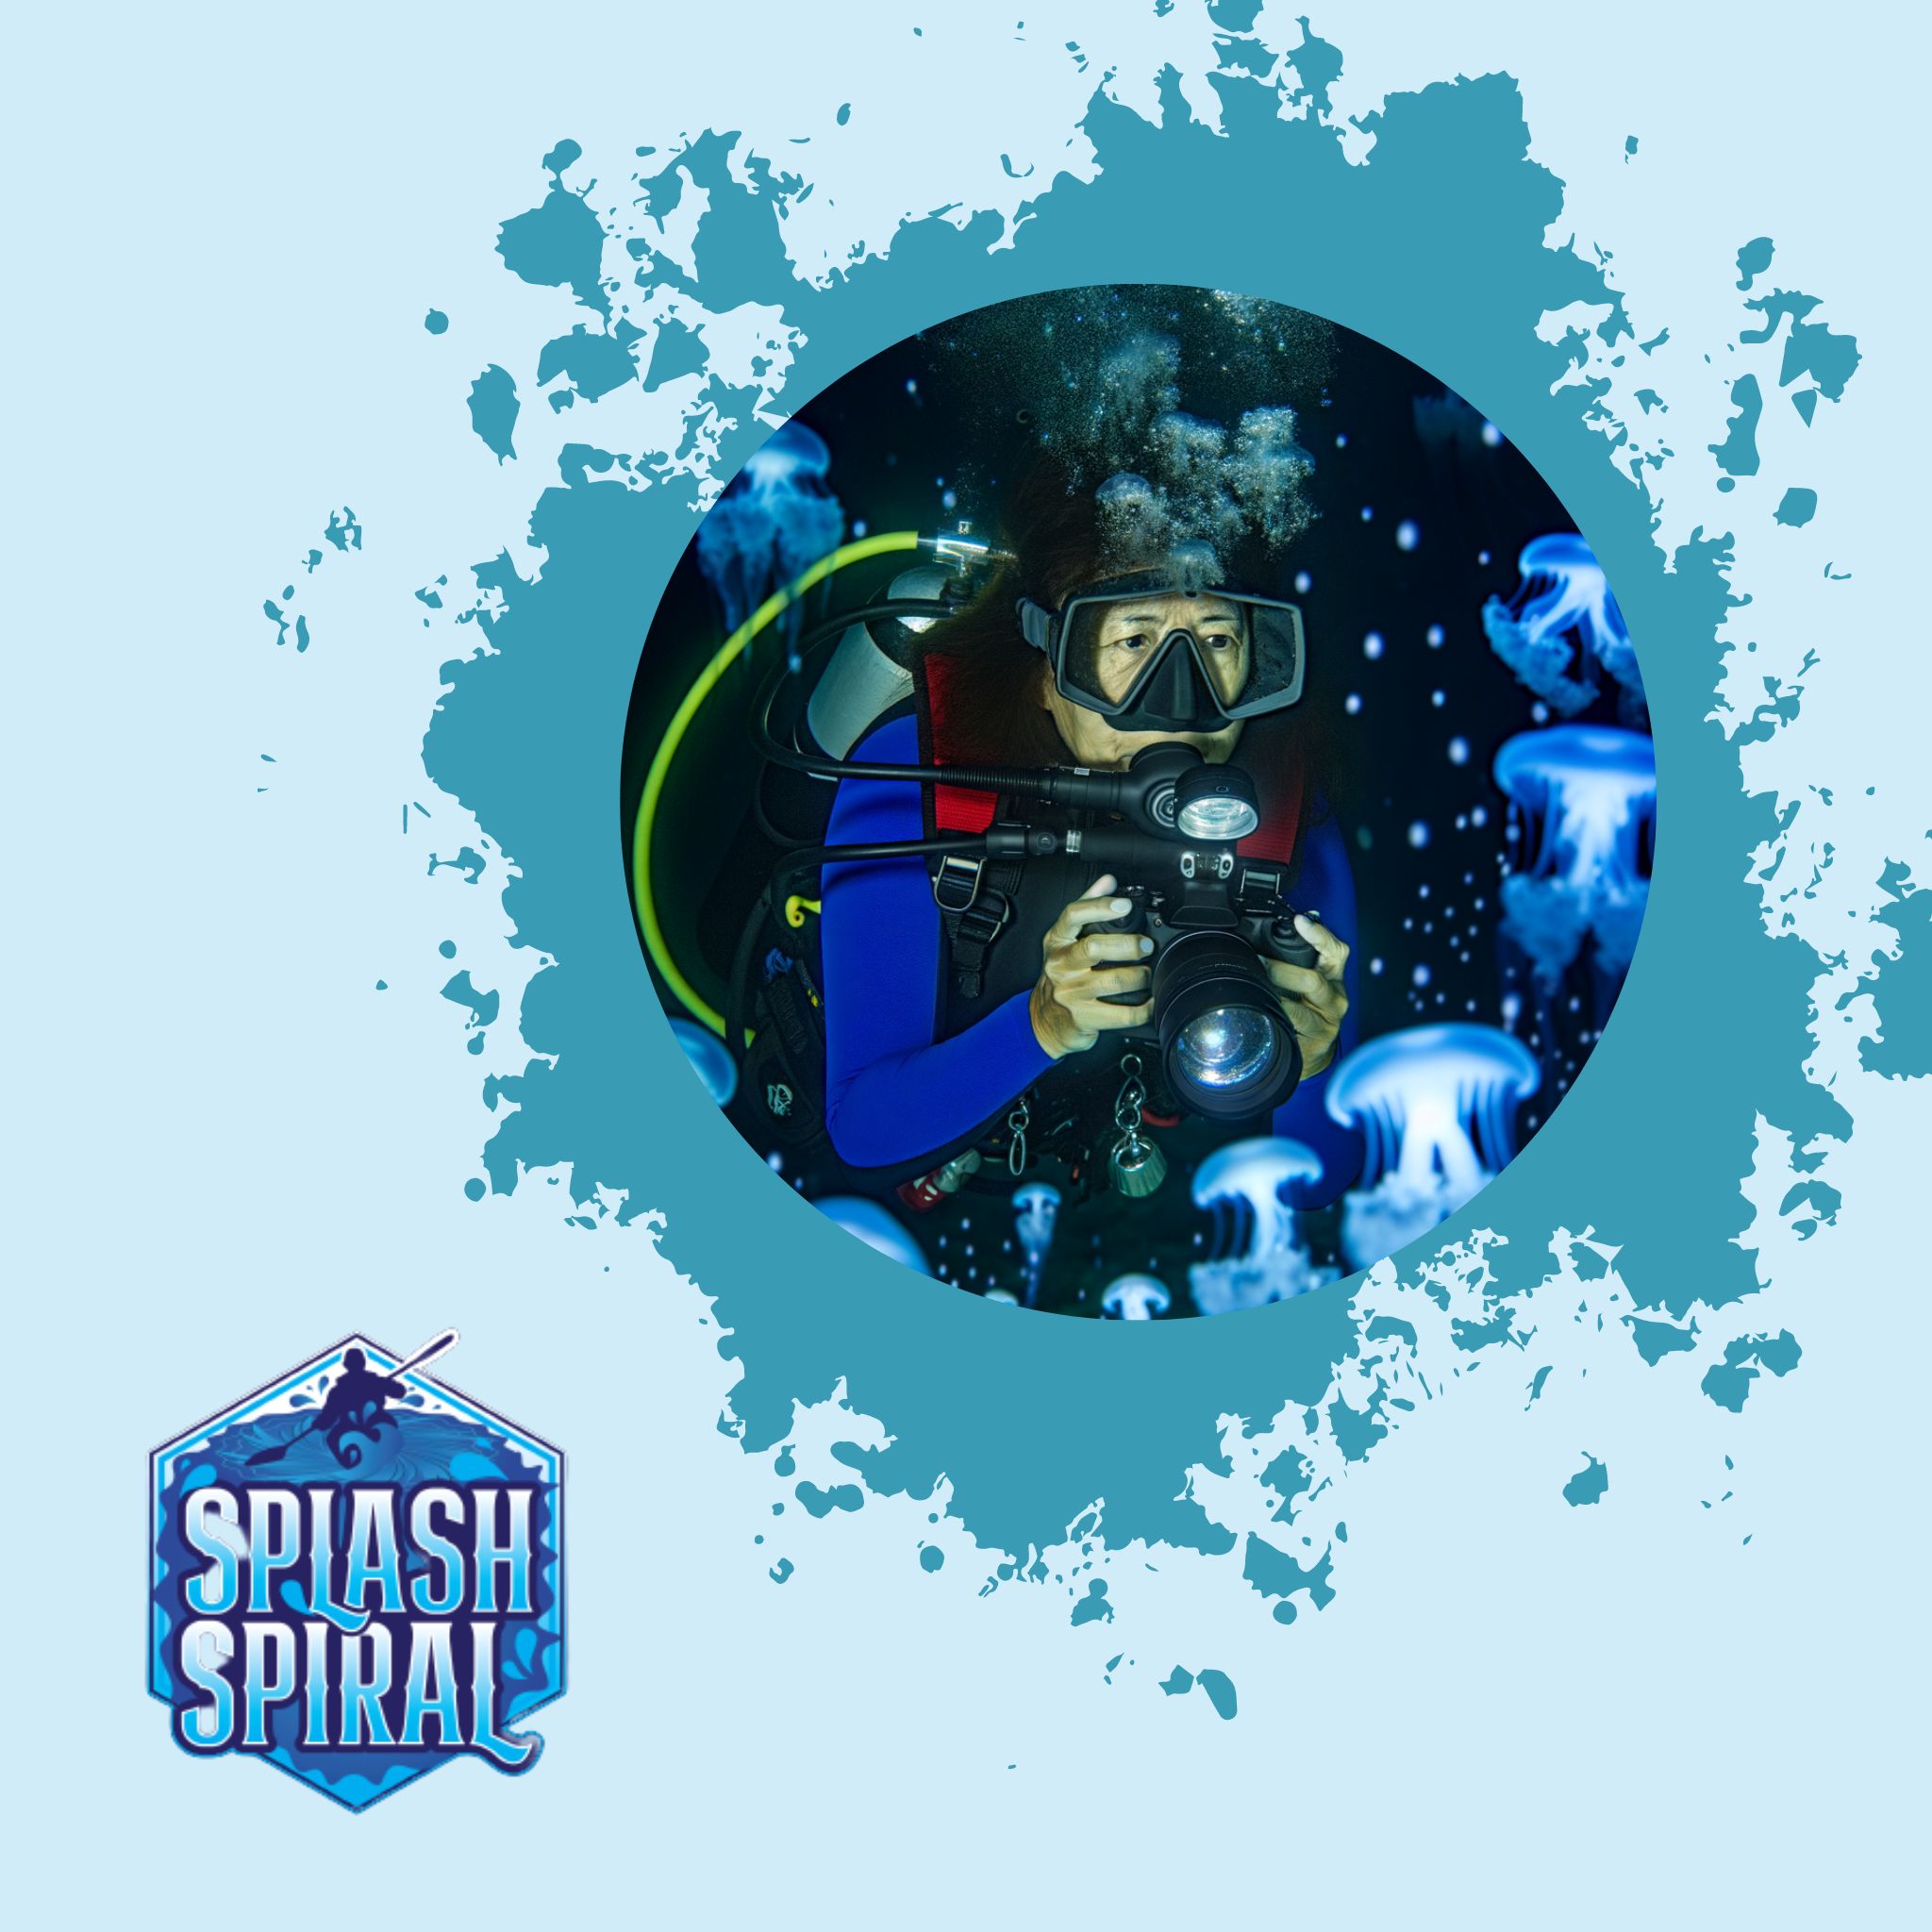
Bioluminescent underwater photography is a fascinating niche that allows divers and photographers to capture the mesmerizing glow of marine organisms. This guide aims to provide you with practical, no-nonsense tips to help you master the art of photographing bioluminescent marine life. Whether you're a beginner diving into underwater photography or an aspiring pro, this guide will illuminate your path.
Introduction
Bioluminescent marine life refers to the fascinating phenomenon where certain marine organisms emit light. This natural spectacle, conjured by chemical reactions within the bodies of creatures like jellyfish, plankton, and certain fish, transforms the underwater world into a glowing dance of blues and greens.
The Thrill of Capturing Bioluminescence
Capturing these moments on camera is both a thrill and a challenge. It's not just about diving; it's about revealing a hidden, fluctuating light show that eludes the naked eye.
For beginners, this niche of underwater photography is particularly enticing:
- Glowing trails left by darting fish
- The gentle, waving glow of bioluminescent algae
The Challenges
However, the challenges are real:
- Low-light conditions
- Movement
- Delicacy of these glowing beings
Combining Skills
Photographing bioluminescent marine life requires a unique skill set:
- Technical knowledge
- Deep appreciation for the underwater world’s subtleties
What This Guide Offers
This guide is aimed squarely at beginner photographers and those new to underwater photography. With practical, straightforward advice, we'll cover everything you need to know to start your journey in capturing the luminous wonders of the deep.
Essential Gear for Bioluminescent Underwater Photography
Capturing the ethereal glow of bioluminescent marine life requires specific gear. Here's a no-nonsense breakdown of what you'll need.
Cameras
When it comes to photographing bioluminescence underwater, not just any camera will do. You'll want something with exceptional low-light capabilities and manual control options.
-
DSLR Cameras:
- Pros: Great sensor sizes, extensive manual control.
- Best For: Advanced photographers who need to tweak settings to perfection.
-
Mirrorless Cameras:
- Pros: Lighter, just as powerful as DSLRs, less bulk.
- Best For: Divers who need comprehensive manual controls without extra weight.
-
Compact Cameras:
- **Pros**: Ideal for beginners.
- **Features to Look For**: Manual control over exposure, aperture, and ISO settings.
Lenses
Lenses can make or break your underwater shot, especially for bioluminescence where precision is key.
-
Wide-Angle Lenses:
- Best For: Capturing the surrounding glow and context.
- Advantage: Minimizes water between the lens and the subject, improving clarity.
-
Macro Lenses:
- Best For: Capturing finer details of tiny bioluminescent organisms.
- Advantage: Fills the frame with your subject, bringing out intricate details.
Lighting Gear
While bioluminescence itself emits light, additional lighting is often needed to balance your shots. Here’s what you need to consider:
-
Underwater Flash:
- Purpose: Provides the right amount of extra light without overpowering natural bioluminescence.
- Feature to Look For: Adjustable intensity.
-
Strobe Techniques:
- Purpose: Freezes motion, reduces blur.
- Tip: Position strobes at a 45-degree angle to minimize backscatter.
-
Practical Pointers:
- **Focus Light Gently**: To avoid washing out natural glow.
- **Use Red Filters**: Red light does not disturb most marine life, allowing you to capture your shot without startling your subject.
Conclusion
Investing in the right gear will significantly enhance your bioluminescent underwater photography experience. With the proper camera, lenses, and lighting equipment, you're setting yourself up for mesmerizing shots that capture the magic of the deep sea glow.
Preparing for the Dive
Scouting and Planning
Before you even think about dipping your toes in the water, location scouting is essential. Focus on areas that are known for their bioluminescent marine life. Bioluminescence hotspots can often be found through local diving communities or online resources dedicated to underwater photography. Make a list of proven spots to increase your chances of capturing stunning bioluminescent displays.
Timing is equally crucial. The best conditions usually align with darker nights—new moons are ideal as they provide minimal ambient light, allowing the natural glow of bioluminescent creatures to shine brightly. Keep an eye on moon phases and always plan your dive during or around the new moon for optimal conditions.
Safety Measures
Your safety underwater should always be a top priority. Conduct thorough equipment checks before your dive. Ensure that your camera gear is securely attached, underwater housing is properly sealed, and your lighting equipment is functioning.
Communication is paramount. Dive with a buddy and have a clear plan if things go south. Familiarize yourself with signals for various underwater situations. Additionally, remain constantly aware of your surroundings and monitor your depth and air supply regularly.
Lastly, consider completing a specialized underwater photography or night diving course. These courses equip you with the skills needed to safely and effectively capture those awe-inspiring bioluminescent moments. For more detailed safety tips, refer to our in-depth guide on Scuba Diving Safety.
Techniques for Capturing Bioluminescent Marine Life
Lighting Underwater
When it comes to capturing bioluminescent marine life, the key is to balance the delicate glow of the organisms with your lighting setup. It’s a game of subtlety and precision.
The role of ambient light shouldn’t be underestimated. For the best results, dive during moonless nights or in locations with minimal light pollution. This only enhances the natural bioluminescence of your subjects. For more details on setting up the perfect ambient light, check our guide here: Mastering Ambient Light.
Strobe positioning is crucial. Position your strobes away from your camera to avoid backscatter—small particles in the water that reflect light directly into your lens, causing unwanted spots in your image. Angle your strobes slightly away from your subject and use the lowest intensity setting that still provides necessary illumination. This allows the bioluminescence to stand out without being washed out by the artificial light.
Camera Settings
Manual settings are your friends here. You’ll need the flexibility to tweak settings on the fly based on your environment and subjects. Let’s break down the key settings:
- ISO: Start at ISO 800 to 1600. This range provides enough sensitivity to capture faint light without introducing too much noise.
- Aperture: Go for a wide aperture (f/2.8 to f/4). This helps to gather more light, vital for low-light conditions.
- Shutter Speed: A slower shutter speed, like 1/30 to 1 second, will help capture the bioluminescent glow. Be mindful, though; too much motion can blur your shot.
It’s also essential to shoot in RAW format. RAW files retain much more detail than JPEGs, allowing for more extensive post-processing. You’ll be able to better adjust exposure, reduce noise, and enhance colors without degrading the image quality.
By mastering these lighting and camera settings, you’re well on your way to capturing stunning shots of bioluminescent marine life. Patience and practice are key—every dive is an opportunity to refine your technique.
Compositional Tips
Getting the right composition is the game-changer for any type of photography, especially bioluminescent underwater photography. Here’s how to nail it.
Firstly, frame your shots to highlight the bioluminescence. Remember, the glow is the star. Position your lens to capture clusters or trails of bioluminescent organisms. Whether it's the gleaming edges of a jellyfish or a school of glowing plankton, make sure they draw the viewer's eye immediately.
Next, use background darkness to your advantage. The surrounding darkness will naturally emphasize the brilliant glow of your subjects. Try to ensure no extraneous light sources sneak into your frame, as they can ruin the magical effect. Leveraging negative space effectively allows the bioluminescence to pop and can provide a sense of vast underwater mystery.
Compositional balance is key. If you have a stationary subject like a bioluminescent coral, position it using the rule of thirds. Imagine your frame divided into nine equal parts and place the subject where the lines intersect. This makes for a more engaging shot that guides the viewer’s gaze naturally.
For dynamic subjects, like swimming fish, leave space in the frame for them to "move into." This technique, known as leading space, ensures your pictures feel more dynamic and alive.
Don’t forget to play with angles and perspectives. A shot taken from above a glowing jellyfish versus one taken from below can tell two completely different stories. Experimenting here can lead to some astonishing results.
Lastly, consider scale wisely. A small glowing organism juxtaposed against a diver or other larger marine life can convey the vastness and wonder of the underwater world. Variety is the spice of life—and photography.
By framing your shots thoughtfully and leveraging the natural darkness and bioluminescence, you’ll be well on your way to creating stunning underwater photos that captivate and inspire. Happy diving!
Professional Tips for Success
Capturing the glow of bioluminescent marine life on camera is as much about skill as it is about persistence. Here are some tips gleaned from seasoned underwater photographers to help you elevate your shots.
-
Learn the Terrain: Spend ample time getting to know the dive sites. Experienced photographers emphasize that understanding the environment is crucial for anticipating your shots. Before diving in with your gear, take a few exploratory dives to familiarize yourself with the areas that typically host bioluminescent organisms.
-
Perfect Patience: If there's one virtue you will need in abundance, it's patience. Photographers who are adept at capturing bioluminescence often say they spend hours, even days, waiting for the right moment. Bioluminescent displays can be sporadic, and nature follows its own schedule. Being persistent and not giving up quickly will pay off.
-
Steady as She Goes: Achieving rock-steady shots is harder underwater. Current and buoyancy can throw off your aim. To minimize blurriness, practice your diving and buoyancy control. Some pros use tripods or stabilizing gear designed for underwater use to keep their cameras steady while they wait for the perfect shot.
-
Manual Mastery: Automatic settings generally won't cut it. Switching to manual mode and having full control over your camera settings is vital. Most professionals recommend low ISO settings to reduce noise, a wide aperture to capture more light without a strobe overpowering the scene, and a slower shutter speed to soak in the glow. Don't be afraid to take the same shot multiple times with slight variations in settings to find the perfect combination.
-
Balanced Lighting: Striking a balance in lighting is an art. Seasoned pros recommend using your strobe sparingly. Overpowering the scene can wash out the bioluminescence, while too little light can make your subject indistinguishable. Use diffusers on your strobes to soften the light, and try side-lighting techniques to add depth without diminishing the natural glow.
-
Focus on Habituation: Marine life can be unpredictable, and certain creatures might be sensitive to your presence initially. Move slowly and approach your subjects cautiously. Let them acclimate to you being there. This will increase your chances of witnessing their bioluminescent displays in a natural, undisturbed manner.
Incorporate these tips with patience and persistence, and you're well on your way to capturing the ethereal world of bioluminescent marine life. Happy diving and snapping!
Ethical Considerations
When diving into bioluminescent underwater photography, it's crucial to practice responsible and ethical behavior to safeguard the delicate marine ecosystems you're eager to capture.
First and foremost, always respect the natural habitat of marine life. Avoid touching, chasing, or disturbing the creatures you encounter. Bioluminescent organisms are often particularly fragile, and physical contact can stress or even harm them. Remember, your role is to be an observer, not an intruder.
To minimize your environmental footprint, maintain good buoyancy control to prevent stirring up sediment, which can harm coral reefs and obscure visibility. Stay mindful of where you position your lighting gear, ensuring it doesn't damage or disturb the environment. Using minimal artificial light helps preserve the natural behavior and cycles of marine life.
Make a habit of following local guidelines and regulations for underwater photography. Many marine protected areas have specific rules to ensure the conservation of their unique ecosystems. Be sure to familiarize yourself with these before your dive.
Lastly, it's essential to advocate for the environment through your work. Share your photos with the intent of educating others about the beauty and importance of marine conservation. By doing so, you'll be contributing to a greater appreciation and respect for the ocean and its luminous inhabitants.
For more detailed guidelines, refer to our comprehensive Underwater Photography Ethics article to ensure your underwater adventures leave only bubbles behind.
Post-Processing
Editing Software
To bring out the best in your bioluminescent underwater photos, you’ll need reliable editing software. Consider the following options:
- Adobe Lightroom and Photoshop: Industry standards offering extensive tools for color correction, noise reduction, and more.
- GIMP or Darktable: Free and feature-rich alternatives for those on a budget.
Techniques
Step-by-Step Guide to Enhance Bioluminescent Effects
-
Import and Organize
- Start by importing your photos into your chosen software.
- Organize your files to keep track of your best shots.
-
White Balance Adjustment
- Tweak the white balance.
- Underwater photos often have a blue or green cast, so adjust the temperature and tint to achieve natural-looking colors.
-
Exposure and Contrast
- Adjust exposure and contrast to make the bioluminescence pop.
- Be cautious not to overexpose and lose detail in the glowing areas.
-
Noise Reduction
- Underwater photography at night can result in high ISO noise.
- Use noise reduction tools to clean up your image without making it look overly smooth.
-
Color Correction
- Experiment with the HSL (Hue, Saturation, Luminance) sliders.
- Boost the saturation of the specific colors that represent the bioluminescence to make them stand out more.
-
Sharpening
- Apply a touch of sharpening to bring out the fine details.
- Be wary of overdoing it, which can introduce unwanted artifacts.
Tips on Noise Reduction and Color Correction
-
Batch Processing
- If you have multiple images under similar conditions, use batch processing.
- Apply noise reduction and basic corrections to all photos at once.
-
Luminance and Color Noise
- Focus on reducing both luminance (grayscale) and color (chrominance) noise.
- Start with luminance noise and fine-tune the settings until the image retains detail without becoming too noisy.
-
Local Adjustments
-
Use local adjustment tools to selectively enhance the bioluminescent areas.
-
Tools like radial filters or adjustment brushes can help you brighten specific parts of your image or reduce noise in targeted areas.
- Non-Destructive Editing
- Always use non-destructive editing techniques.
- This allows you to revert or fine-tune adjustments without degrading image quality.
- Lightroom offers virtual copies, and Photoshop provides adjustment layers for this purpose.
By mastering these post-processing techniques, you'll be able to transform your raw underwater shots into stunning visual stories that capture the magical glow of bioluminescent marine life. Happy editing!
Conclusion
Capturing bioluminescent marine life on camera is both an art and a science. With the right gear, careful planning, and thoughtful execution of techniques, you can immortalize the ethereal glow of underwater creatures.
Essential Gear
- Cameras and Lenses: High-quality equipment is crucial for capturing the faint light emitted by bioluminescent organisms.
- Lighting Setups: Proper lighting helps enhance visibility without overwhelming the delicate natural light.
Key Preparation Steps
- Research locations known for bioluminescent marine life.
- Understand the behavior of the creatures you plan to photograph to predict their movements.
- Ensure your equipment is waterproof and tested for underwater conditions.
Actionable Shooting Tips
- Use long exposure settings to capture the sustained glow of bioluminescent organisms.
- Maintain a steady hand or use a tripod to avoid blurry images.
- Experiment with angles and distances to find the most captivating shots.
Responsible Practices
It's imperative to respect marine life and their habitats to ensure the sustainability of these extraordinary creatures. Practice eco-friendly diving and adhere to local regulations.
Final Thoughts
Embarking on this journey requires patience and persistence, but the awe-inspiring results are well worth it. Whether you're a beginner or looking to refine your skills, armed with this guide:
- Dive in and let the incredible, glowing world beneath the waves light up your photography.
- With practice, you'll be able to capture the magic of bioluminescent marine life, one breathtaking shot at a time.
Happy diving!