Natural light in shallow water can transform your underwater shots from simple to stunning. As a beginner diving into the world of photography, capturing the essence of marine life and vibrant underwater sceneries can be both fulfilling and challenging. Here's a guide to help you harness natural light and take your shallow water photography to the next level.
Introduction
Shallow water natural light photography is an exciting entry point into the world of underwater photography. It's all about leveraging daylight filtering down through the surface to illuminate marine life and underwater landscapes in their most vibrant and vivid forms.
Why Natural Light?
For beginners, understanding and utilizing this natural light is essential to achieving stunning underwater shots that truly capture the underwater world's beauty.
Challenges and Techniques
Using natural light effectively underwater isn't just about pointing your camera and shooting; it requires a bit of knowledge and technique. Here are some considerations:
- Light Behavior Underwater: Water absorbs and scatters light differently than air, posing unique challenges.
- Knowledge and Technique: Knowing how to navigate these challenges opens up a world of creative possibilities.
By mastering how to use natural light, you can enhance the clarity, color, and overall impact of your underwater photos, making even the simplest subjects appear extraordinary.
Understanding Natural Light in Shallow Water
How sunlight behaves underwater
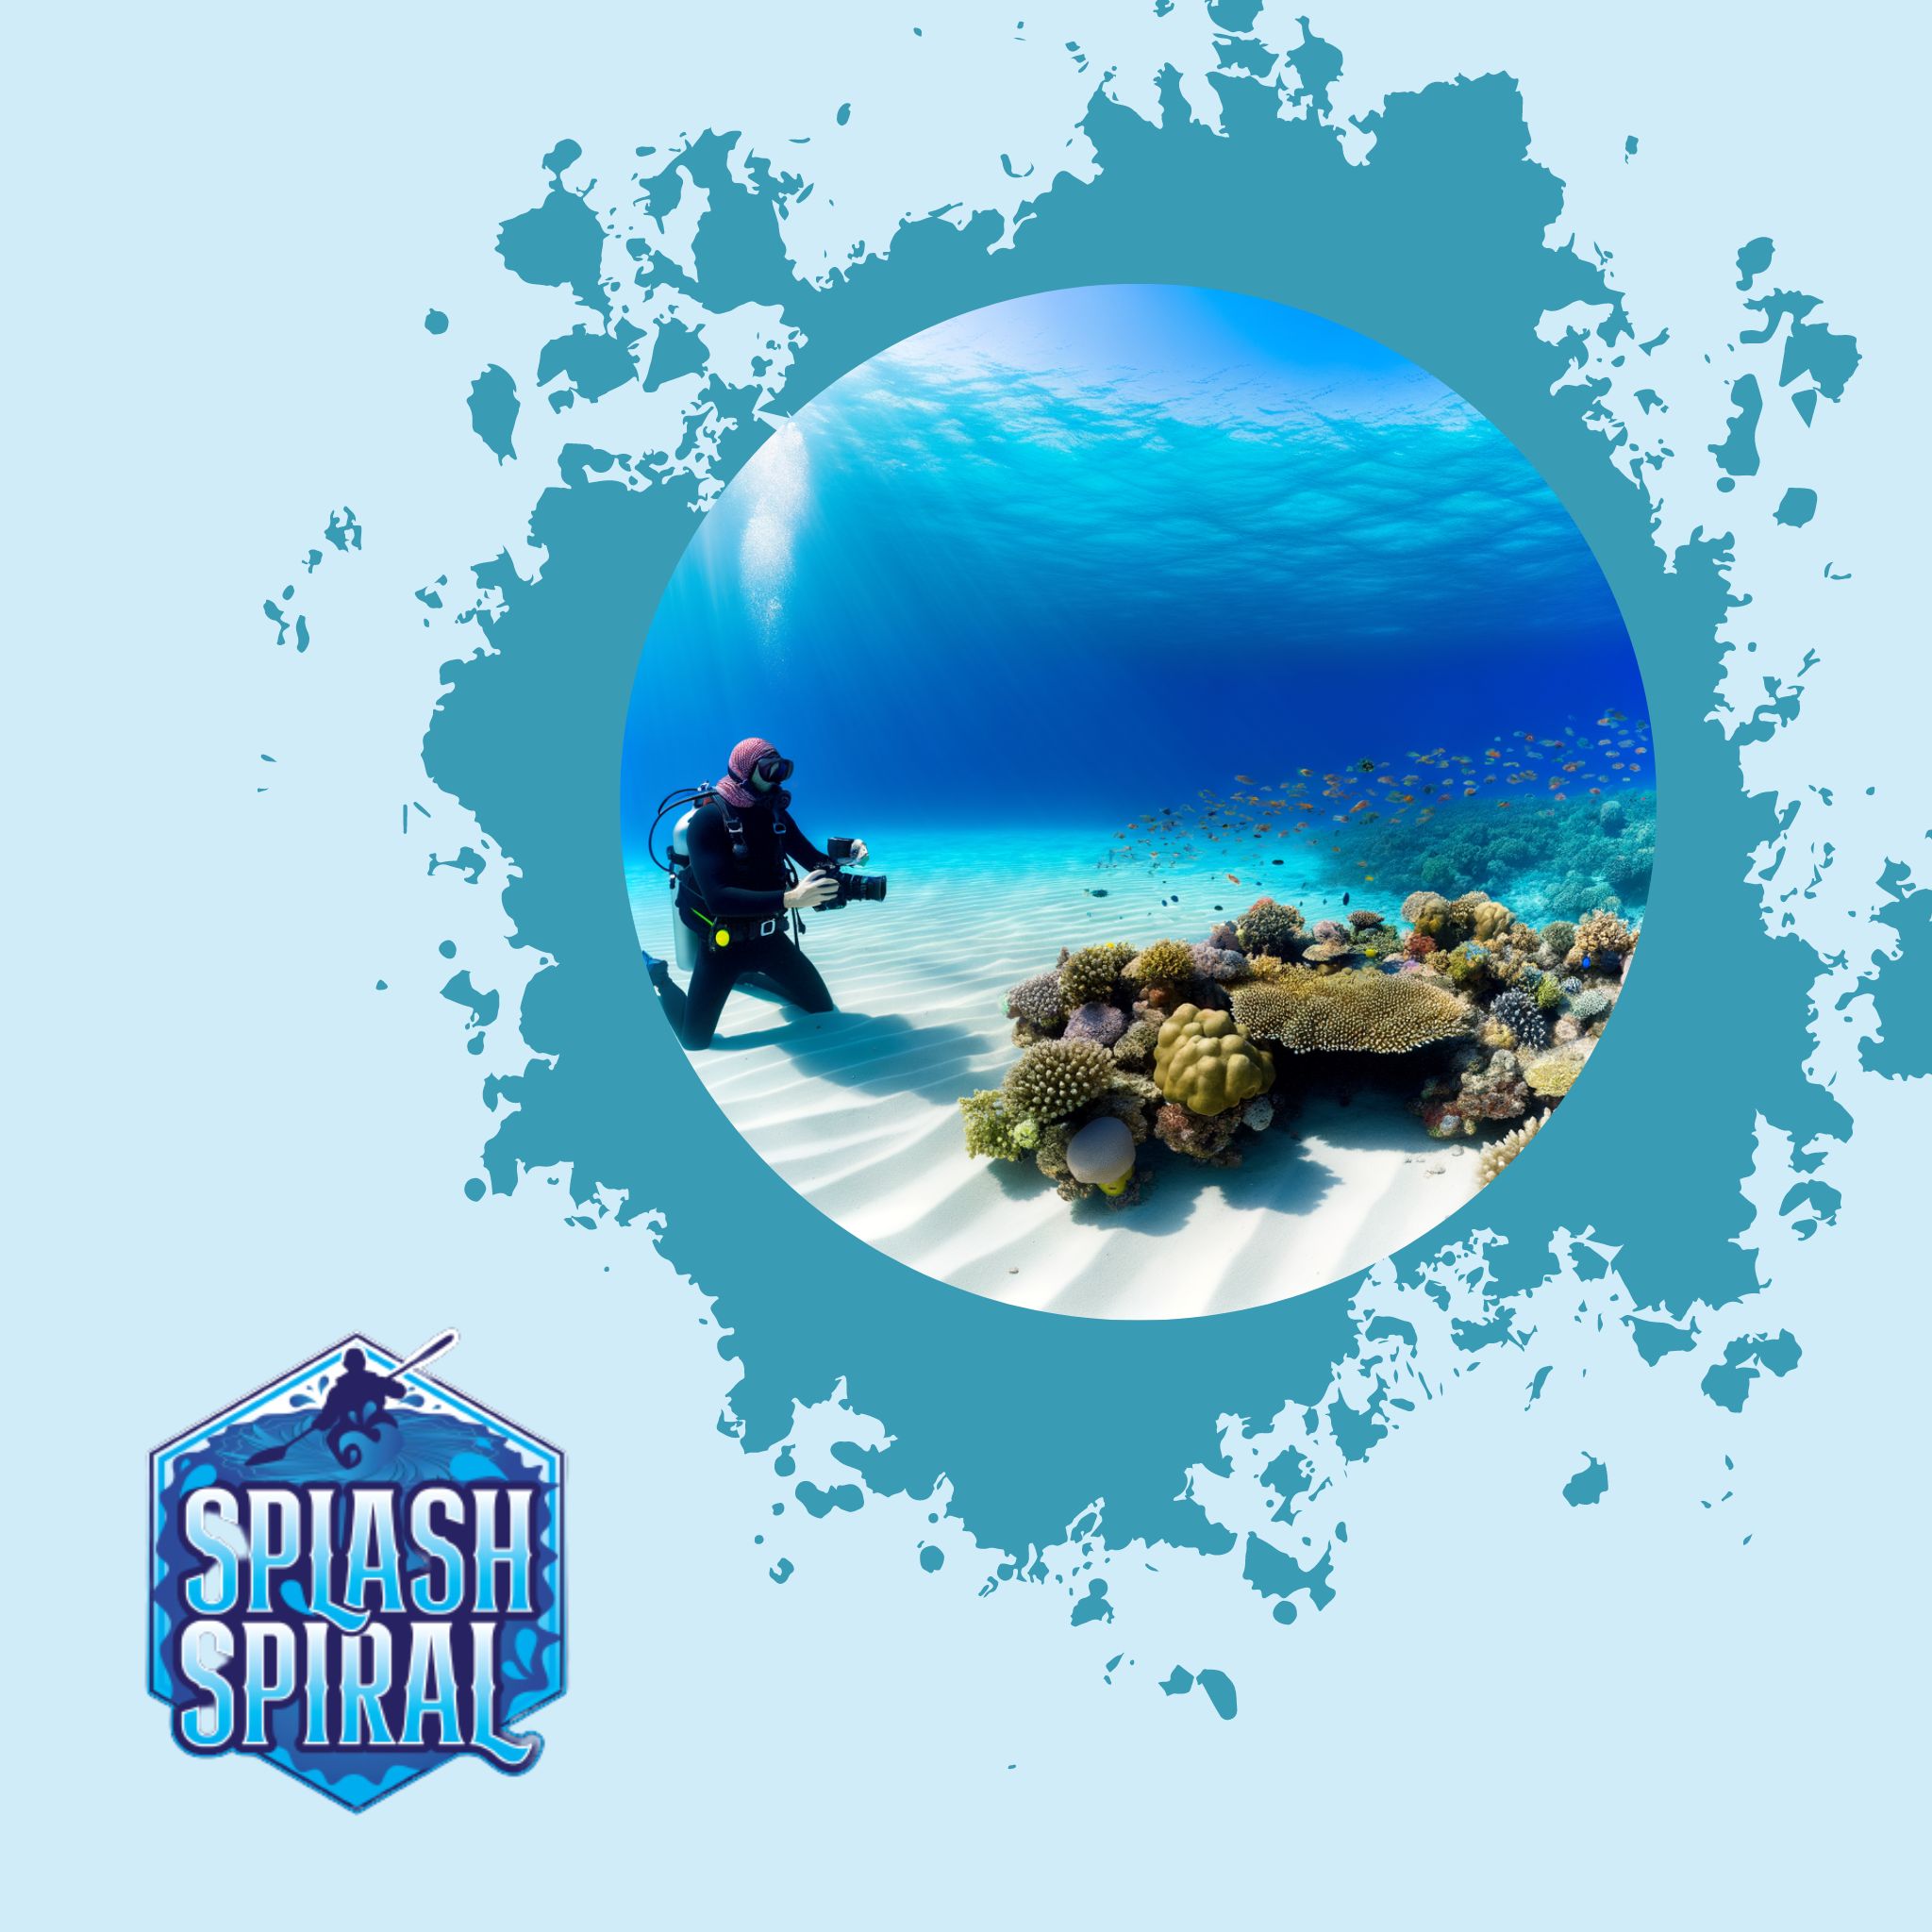
When sunlight enters the water, it acts differently compared to how it behaves on land. Water absorbs and scatters light, which means that the further you dive, the more light is lost. In shallow water, however, there's still plenty of natural light to work with. The surface ripples and the type of water (clear versus murky) will also affect how light penetrates. Understanding these dynamics is crucial to leveraging natural light effectively.
Advantages of utilizing natural light in shallow water
Using natural light for your shallow water shots has several advantages. Firstly, it offers rich, natural colors that artificial lights often struggle to replicate. The blues and greens in your photos will look more vibrant and accurate. Secondly, you won't have to lug around bulky lighting equipment, making your diving experience more enjoyable and less cumbersome. Lastly, natural light makes for a more realistic portrayal of underwater life, giving your photos an authentic and lifelike quality.
The best times of day for optimal lighting in underwater photography
Timing is everything when it comes to natural light. Typically, the light is best during the early morning and late afternoon. During these times, the sun is lower in the sky, producing softer and more diffused light. This reduces harsh shadows and highlights, creating a balanced exposure that enhances the beauty of your underwater shots. Midday light, although intense, penetrates deeper and can be used effectively if you know how to work with the harsher angles. It’s all about experimenting to see what works best in your specific location and conditions.
Essential Gear for Shallow Water Natural Light Photography
To get started with shallow water photography using natural light, you'll need some key pieces of equipment. Here's a breakdown of the basics you'll need to capture stunning underwater shots.
Basic Camera Equipment Needed
- Underwater Camera: Whether you're using a dedicated underwater camera or a compatible DSLR/mirrorless camera in an underwater housing, make sure it is rated for at least the depths you'll be diving.
- Lens: A wide-angle lens is ideal for underwater photography as it allows you to get close to your subject while capturing a broader scene. A macro lens can also be useful for capturing intricate details of smaller marine life.
- Underwater Housing: This is essential for keeping your camera safe from water damage. Ensure the housing is a snug fit for your camera model and rated for the depth you plan to dive.
Recommended Accessories
- Filters: A red filter can be very useful for shallow water photography, as it helps correct the color balance by reducing the blue/green tint that water often imparts. These filters are usually attached directly to the lens.
- Buoyancy Control: Adding a buoyancy arm or weight to your setup can help stabilize your camera rig, making it easier to frame shots and reduce camera shake.
- Strobes and Lights: While natural light is your primary source, having supplemental lighting options can help in low-light situations or when shooting in shadows. Look for strobes or continuous lights that are specifically designed for underwater use.
Quick Overview on Equipment Maintenance
- Rinse Gear Thoroughly: After every dive, rinse your camera, housing, and accessories in fresh water to remove salt, sand, and other debris that can cause damage.
- Check Seals and O-Rings: Regularly inspect the seals and O-rings on your underwater housing. Look for any signs of wear and replace if necessary to prevent leaks.
- Battery and Memory Management: Ensure you have fully charged batteries and ample memory card space before each dive. Consider carrying spares for longer sessions.
By equipping yourself with the right gear and taking good care of it, you’ll be well-prepared to make the most of natural light in your shallow water photography. Dive in, experiment, and see how the underwater world comes alive through your lens.
Techniques for Capturing Natural Light Underwater
When it comes to shallow water photography, positioning, reflections, and camera settings are your best friends. Here are some practical tips to get you started.
Tips for Positioning Yourself and Your Subject Relative to the Sun
First things first, the sun’s position is a game-changer. Generally, you'll get the best natural light between 10 a.m. and 2 p.m. when the sun is directly overhead. This helps minimize shadows and provides even lighting on your subjects.
- Top-down lighting: Position yourself so that the sun is directly above you. This lighting can create beautiful, vivid shots with minimal shadows. Just be mindful of your own shadow intruding into the frame.
- Side lighting: When the sun is a bit lower and off to the side, it can create interesting textures and dramatic effects, highlighting the natural contours of marine life.
How to Utilize Water Surface Reflections
The surface of the water acts as a dynamic reflector. Use it creatively to amplify the natural light:
- Use calm, clear days: The calmer the water, the more reflective the surface, which can add a stunning glow to your photos.
- Look for patterns: Surface reflections can create cool, abstract patterns. Capture these for some artistic shots.
- Shooting upwards: Sometimes pointing your camera upwards to include the water surface captures a mesmerizing reflection of the underwater world.
Adjusting Camera Settings for Optimal Exposure
Managing exposure underwater can be tricky but here are the essential settings to tweak:
- White Balance: Set your camera’s white balance manually or use an underwater mode if available. This helps counteract the blue tint water imparts on photos.
- ISO: Since you're in shallow water with plenty of light, keep your ISO low (around 100-400) to minimize noise.
- Aperture: A mid-range aperture (f/8 – f/11) strikes a good balance, giving you a decent depth of field without compromising light.
- Shutter Speed: You'll need a faster shutter speed to freeze movement caused by water currents (1/250s or faster).
Remember, practice is key. Start experimenting with these techniques and settings to see how they work for your unique underwater environment. Soon, you’ll be effortlessly using natural light to capture the vivid beauty beneath the surface.
Composition Tips for Underwater Photography
Getting the composition right is as crucial under the water as it is on land. In shallow water photography, natural light can be your best friend when it comes to framing compelling shots. Here are some key tips to help you harness this valuable resource.
Basic Principles of Underwater Composition
-
Rule of Thirds: Just like in traditional photography, the rule of thirds can guide you in creating balanced and engaging images underwater. Imagine the frame is divided into nine equal sections by two equally spaced horizontal lines and two equally spaced vertical lines. Place your primary subject along these lines or at their intersections.
-
Negative Space: Utilize negative space to highlight your subject. Water can act as the perfect backdrop, offering a serene and uncluttered background that makes marine life stand out.
-
Leading Lines: Items like seaweed, coral formations, or the rays of sunlight filtering through the water can act as leading lines, directing the viewer’s eye towards the main subject of your photo.
How to Frame Your Subjects Using Natural Light
-
Top-Down Lighting: In shallow water, the sunlight usually comes from above. Position yourself to shoot downward and let the natural light illuminate your subject from the top. This can add a dramatic effect, especially when photographing colorful coral reefs or marine creatures with vivid patterns.
-
Silhouettes: If you're shooting against strong sunlight, try capturing silhouettes for a striking image. Position your subject between you and the light source, then underexpose the shot slightly to enhance the silhouette effect.
-
Backlighting: For a more ethereal look, use backlighting effectively. Position the sun behind your subject to create a glow around the edges, making them seem almost luminescent. This technique works well with translucent subjects like jellyfish or sea anemones.
Examples of Effective Shallow Water Shots
-
Upward Shots: Aim from below and shoot upwards towards the water surface. This can amplify the natural light and create a striking backdrop, especially when the sun is at a low angle in the sky.
-
Angles and Perspectives: Experiment with different angles. Rather than always shooting straight on, try capturing your subject from below their level or at an angle that incorporates natural surroundings like coral or rock formations.
-
Natural Frames: Use the underwater environment to frame your shots. Swim through coral arches or use a school of fish to naturally border your subject, leveraging the ambient light to create depth and context.
By understanding and applying these composition tips, you can make the most of natural light in your underwater photography. Remember to practice these techniques and soon, capturing breathtaking underwater images will become second nature to you. Happy diving and shooting!
Editing and Post-Processing
Once you've captured your underwater shots, the magic doesn't stop there. Editing and post-processing are crucial steps to make your images truly pop. Here's a streamlined approach to get you started.
Introduction to Photo Editing Software Useful for Underwater Photography
For beginners, user-friendly software like Adobe Lightroom, Adobe Photoshop, and even free options like GIMP can help you refine your images. These programs offer a variety of tools specifically tailored for underwater photography, such as color correction and exposure adjustments.
Steps for Underwater Color Correction and Image Enhancement
Underwater photos often suffer from a blue or green cast due to light absorption. Here's a quick process to correct that:
-
White Balance Adjustment: Set the correct white balance to neutralize the color cast. Look for a white or neutral object in your photo to use as a reference point.
-
Exposure and Contrast: Adjust the exposure to ensure your image isn't too dark or overexposed. Increase the contrast to add depth and dimension to your photos.
-
Color Correction: Use the color sliders to enhance the natural hues of marine life. Typically, you'll need to add reds and yellows that get absorbed underwater.
- Sharpness and Clarity: Use the sharpness and clarity tools to make the details in your shot stand out. Be careful not to overdo it, as this can introduce noise.
An Easy-to-Follow Editing Workflow
-
Import Your Photos: Organize your images in the software's library for easy access.
-
Basic Adjustments: Begin with white balance, then move to exposure and contrast.
-
Detailed Enhancements: Focus on color corrections, sharpening, and clarity.
-
Crop and Rotate: Make any necessary adjustments to improve composition.
-
Final Review: Take a last look over your edits to make sure they enhance rather than detract from your original shot.
By following these steps, you can breathe new life into your underwater photos, enhancing the natural beauty captured by the interplay of light and water. Happy editing!
Addressing Common Challenges
Shallow water photography comes with its own set of hurdles. However, with some know-how and a bit of practice, you'll find ways to effectively manage these obstacles and improve your underwater shots. Let's dive into some of the more common challenges and how to overcome them.
Dealing with Water Movement and Clarity
Water movement, whether caused by currents, waves, or even your own body, can blur your images. To combat this, practice steady breathing and minimize your movements when taking a shot. Use your fins and hands sparingly to adjust your position. For clearer shots, consider shooting in sheltered areas like coves or bays where the water is calmer.
Water clarity, or visibility, is another major factor. The clearer the water, the better your photos will look. Plan your dives for days with calm weather and less wind. Avoid disturbing the sand or sediment on the seabed, as this can cloud the water. Always keep an eye on the forecast and aim for locations known for good visibility.
Overcoming Issues Related to Light Absorption and Scattering
As light travels through water, it loses intensity and changes color, with reds and oranges fading quickly, and blues and greens dominating. This phenomenon can make your underwater photos appear washed out or lacking in contrast.
To counter this, try to get as close to your subject as possible. The less water between your camera and the subject, the less impact light absorption and scattering will have. Using a red or magenta filter can also help restore some of the lost colors, especially in shallow waters where natural light is still relatively strong.
Tips on Improving Shot Stability
Stability is key to sharp and clear photos. In addition to maintaining buoyancy control and minimizing your movements, using a tray and handles with your camera housing can provide extra stability. This setup helps you hold the camera steady and reduces the chance of motion blur.
If you're shooting with a DSLR or mirrorless camera, consider using a wrist strap or lanyard to add an extra point of contact and further stabilize your shots. Precision and patience can make a significant difference, so take your time to compose each shot carefully.
By understanding these common challenges and employing these tips, you'll be on your way to capturing stunning underwater images using natural light. Don't get discouraged by initial difficulties; with practice and perseverance, your skills will improve, and so will the quality of your photos.
Inspirational Resources
To keep your creative momentum flowing, here are some handpicked resources that dive deeper into various facets of underwater photography.
-
Capturing Shipwrecks: Tips for Underwater Wreck Photography: Enhance your skills by learning how to tackle the mystique and complexity of photographing shipwrecks. This guide covers everything from lighting techniques to the best angles for capturing these underwater marvels.
-
Top Underwater Photography Books for Inspiration and Learning: Fill your bookshelf with these essential reads. They not only offer technical insights but also provide a wealth of inspiration through breathtaking images and expert tips from seasoned photographers.
-
Scuba Diving Basics: Brush up on your fundamental scuba skills, which are crucial for any aspiring underwater photographer. This resource dives into the essentials, ensuring that you are comfortable and confident in the water.
- General Diving Tips: Expand your overall diving knowledge with these general tips. Whether you're a novice or looking to fine-tune your abilities, this guide offers practical advice to make every dive smoother and safer.
Exploring these resources will not only bolster your technical prowess but also spark new ideas and perspectives for your underwater photography journey. Happy diving!
Conclusion
Mastering the use of natural light in shallow water photography is a game changer. It helps to bring out the vibrancy of marine life and the stunning textures of underwater landscapes. By understanding how sunlight behaves underwater, gearing up with the right equipment, and practicing essential techniques, you'll be able to capture breathtaking photos that stand out.
Don't be afraid to experiment; that's where the fun begins. Practice during different times of day and in varied water conditions to see how light interacts with your surroundings. Remember, the journey to great underwater photography is continuous learning and adapting.
So, grab your gear, dive in, and let the natural light guide your shots. With patience and persistence, your underwater photos will truly shine.