Taking the leap into underwater photography is thrilling — but capturing shipwrecks can elevate your journey to a whole new level. If you're just starting out or looking to refine your skills, this guide will give you clear, practical steps to get the best shots possible.
Introduction
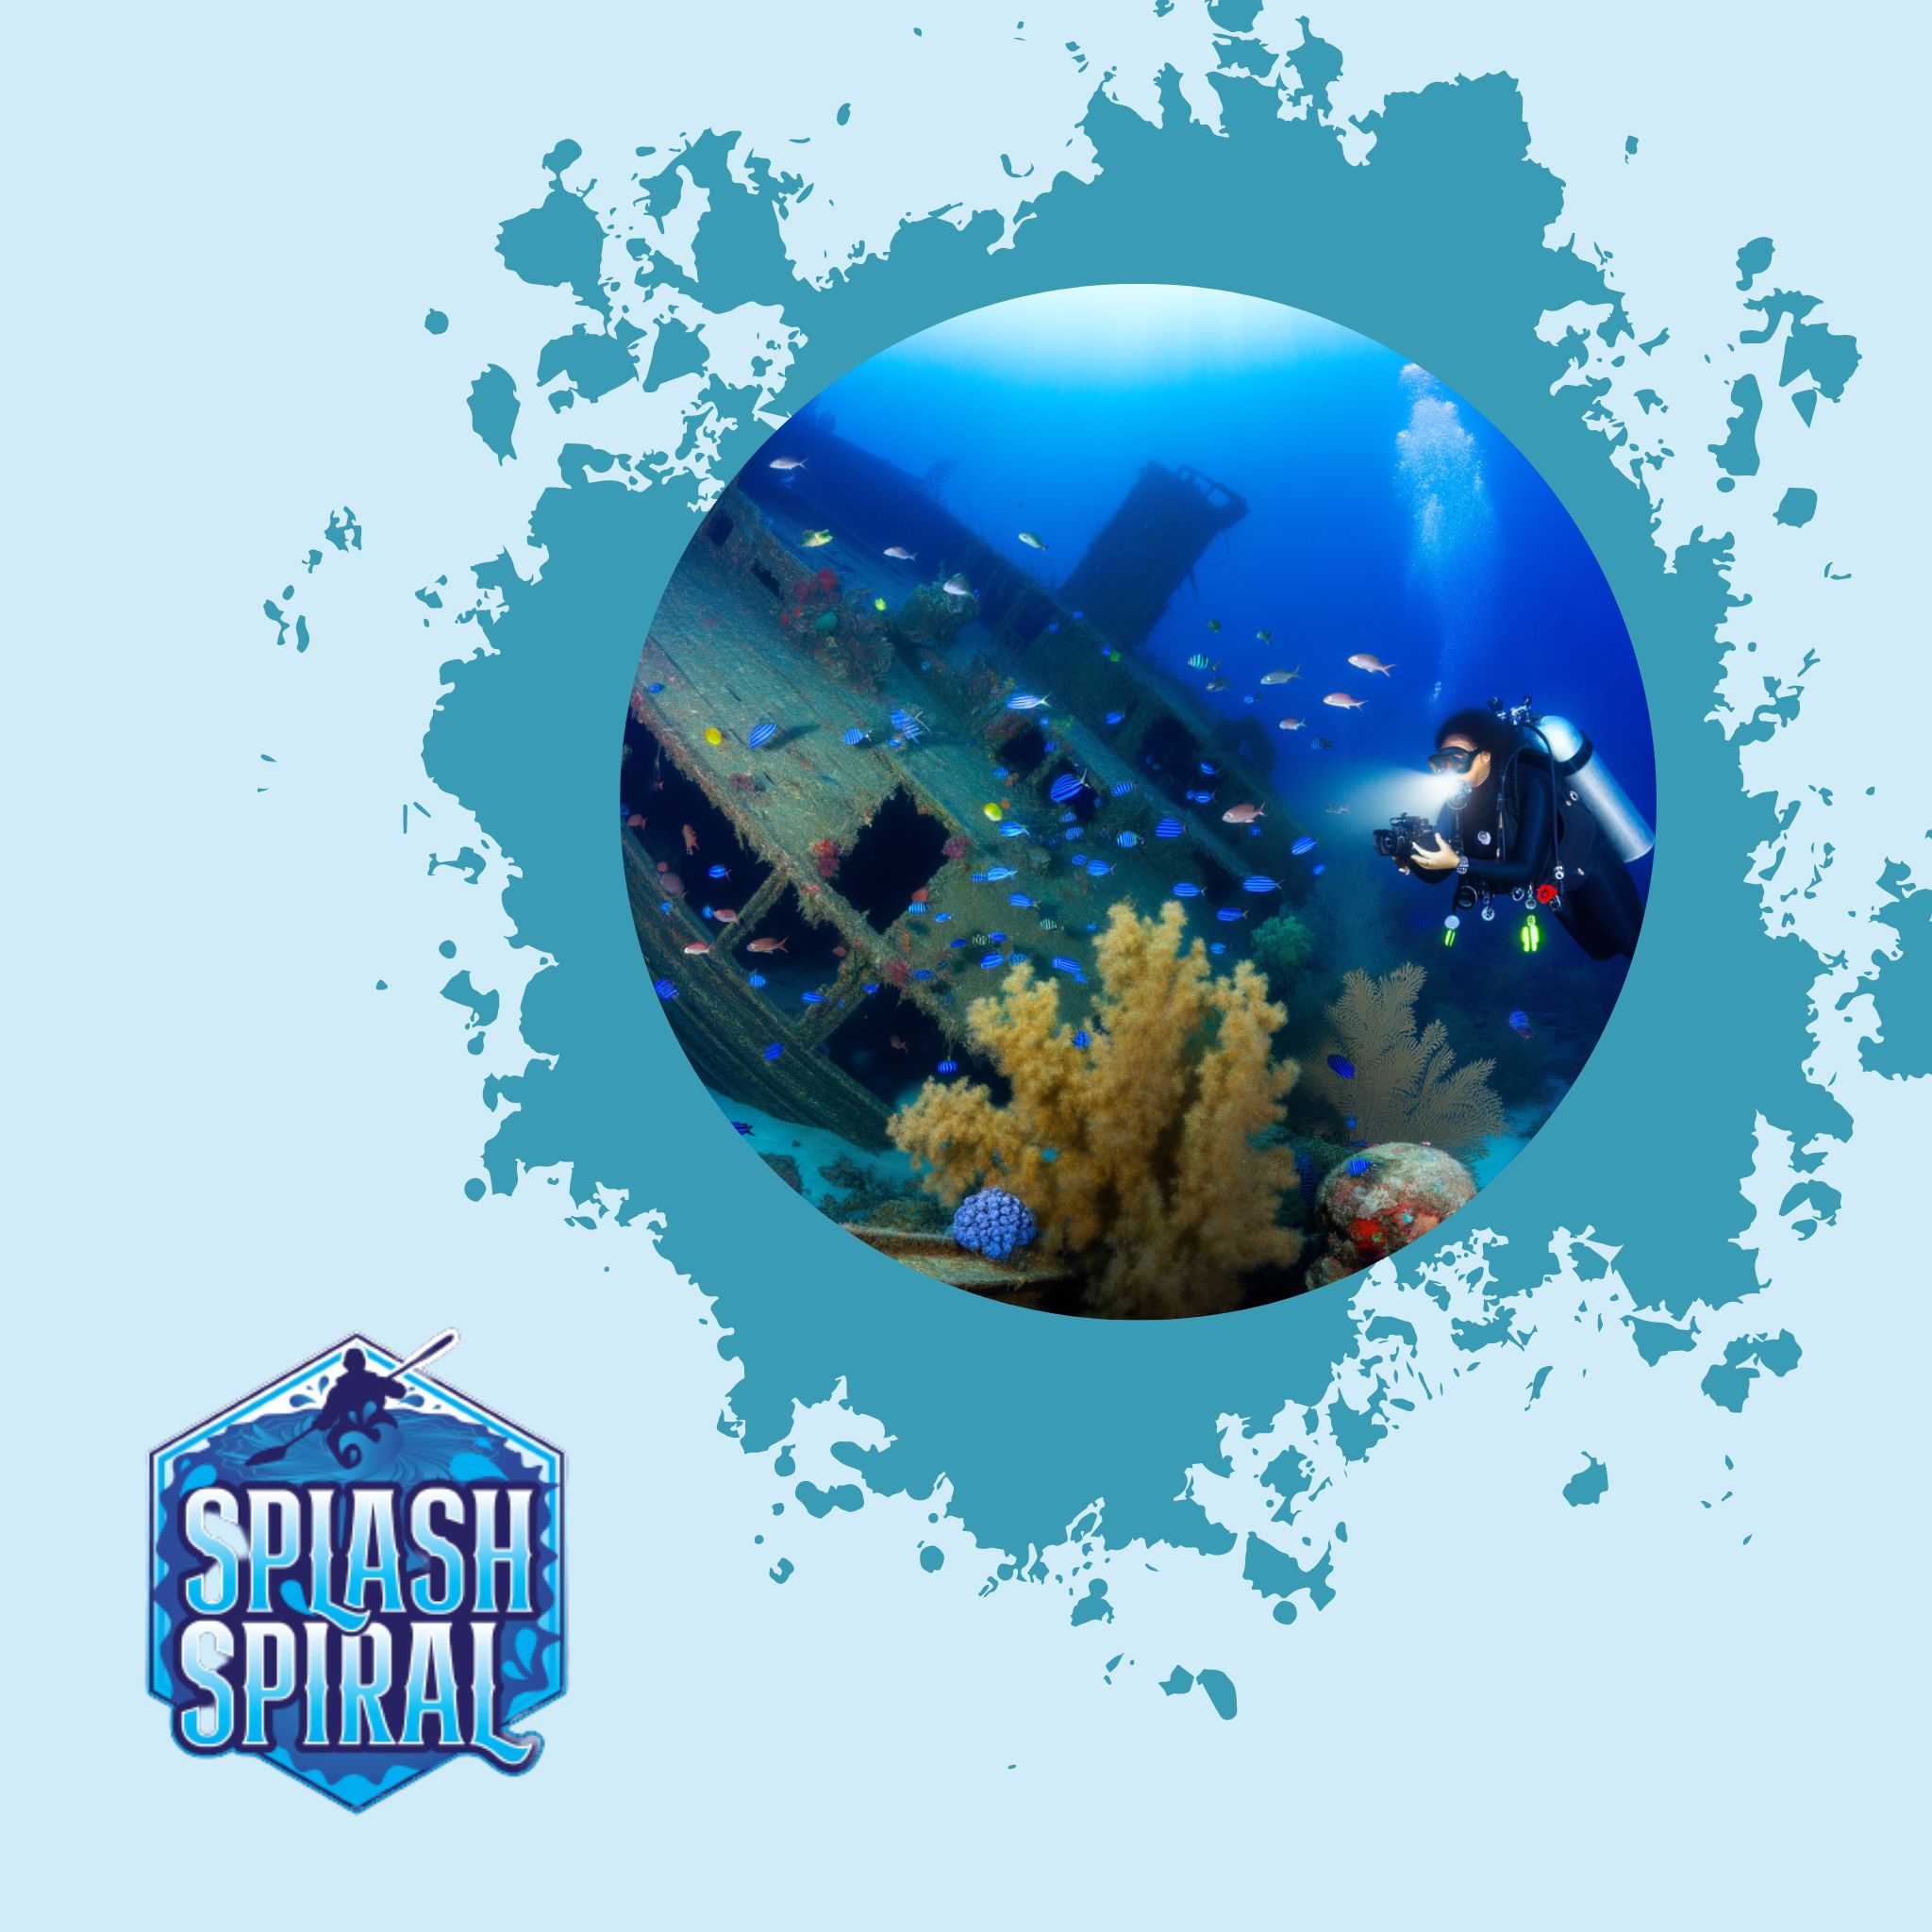
Underwater shipwreck photography has been gaining traction among both beginners and seasoned divers. The allure of capturing the haunting beauty of submerged vessels and relics is irresistible and can lead to some truly breathtaking images. Whether it’s the eerie tranquility of a sunken ship or the bustling marine life that now calls it home, shipwrecks offer a compelling subject for underwater photographers.
However, combining the skills needed for diving with those required for handling photography equipment underwater can be a challenging endeavor. Balancing buoyancy, keeping your camera gear safe, and navigating often murky waters are just a few of the hurdles you'll need to overcome. This guide aims to streamline the process, giving you practical advice and clear steps to get started on your journey into underwater shipwreck photography.
Choosing the Right Equipment for Underwater Shipwreck Photography
Diving into underwater wreck photography starts with having the right gear. Here’s a breakdown of what you need:
Waterproof Camera Case
Underwater Gear
You'll never get a decent shot if your gear isn't up to par. For starters, you'll need a high-quality underwater camera. If you're not looking to break the bank, there are entry-level cameras that still offer good performance. However, as you progress, you might want to invest in more specialized equipment.
Some essentials include underwater lenses that reduce distortion and enhance clarity. Wide-angle lenses are particularly useful for capturing the vastness of shipwrecks. Additionally, consider a set of underwater lights; they are crucial for illuminating dark crevices and bringing out colors that get muted underwater.
Camera Protection
Even the best equipment is useless if it's not properly protected. Pressure and water can wreak havoc on your camera gear. Invest in a sturdy underwater housing that matches your camera model. This housing will shield your camera from water damage and handle the pressure at different depths.
Regular maintenance is also crucial. Rinse your gear with fresh water after each dive to prevent salt buildup. Check seals and O-rings regularly for wear and tear, and replace them as needed. With the right care, your equipment can last for years and many plunges into the deep.
By making smart choices with your gear, you can focus on what really matters: capturing the beauty and mystery of underwater shipwrecks.
Essential Diving Equipment for Underwater Photography
Getting the perfect shot of a shipwreck doesn't just depend on your camera gear — your diving equipment plays a critical role too. Here's the lowdown on what you need to ensure a seamless underwater photography experience.
Basic Diving Gear
To get started, you'll need some crucial diving equipment that not only keeps you safe but also allows for ease of movement and stability while you're focused on capturing that perfect image.
-
Mask and Snorkel
- A clear, comfortable mask is essential. Make sure it fits well to prevent water leaks, and consider investing in a low-volume mask for better vision.
- A snorkel allows you to conserve air from your tank when you're on the surface.
-
Fins
- Opt for fins that provide a good balance of propulsion and maneuverability.
- Stiffer fins are great for speed and control, but if you're a beginner, you might prefer a softer pair to reduce strain.
-
Regulator and Octopus
-
Your regulator is your lifeline underwater, converting high-pressure air from your tank to breathable air.
-
The octopus is a secondary regulator that acts as a backup, and both need to be maintained meticulously.
-
Buoyancy Control Device (BCD)
- A well-fitting BCD is crucial for maintaining neutral buoyancy, giving you the stability needed to take steady shots.
- Look for one with ample storage for any extra gear or tools you might need.
-
Dive Computer
- This handy device calculates your depth and bottom time, helping you manage your dive plan and stay within safe limits.
- Some models even come with integrated compasses, which can be invaluable when navigating complex wreck sites.
Advanced Diving Equipment
Once you’re comfortable with the basics, you might want to upgrade to some advanced diving gear to enhance your underwater photography experience.
-
Underwater Scooter (DPV)
- For larger wrecks or frequent dives, an underwater scooter, or Diver Propulsion Vehicle (DPV), can save you a lot of energy.
- It allows you to cover more ground quickly, giving you more time to focus on photography.
-
Drysuit
- If you're diving in colder waters, a drysuit provides superior thermal protection compared to a wetsuit.
- Drysuits are more complex and require additional training, but they can significantly lengthen your dive time in chilly waters.
-
Strobe Lights and Arm Systems
-
These are critical for illuminating your subject in the often dim conditions of underwater environments.
-
Strobes enhance colors and details that natural light can't reach.
-
The arm system allows for flexibility in positioning these lights, helping you reduce backscatter and achieve optimal lighting angles.
- Rebreather
- For the truly committed, a rebreather can extend your dive times and reduce bubble noise that can scare off marine life.
- It's more complex and requires thorough training but offers unparalleled benefits for serious underwater photographers.
Both basic and advanced diving gears serve distinct purposes, helping ensure safety, comfort, and the quality of your underwater shots. Make sure to invest in gear that suits not only your current needs but also your long-term diving goals.
Camera Settings and Techniques for Underwater Shipwreck Photography
Optimal Camera Settings
Getting your camera settings right is crucial for capturing stunning underwater shots. Here's a straightforward guide to help you set up:
-
Aperture:
- Range: f/8 to f/11
- Benefit: Good depth of field, keeping the shipwreck in focus while still allowing enough light to enter the camera.
-
Shutter Speed:
- Recommendation: 1/125s or faster
- Purpose: Minimizes motion blur from both your movement and the underwater environment.
- Tips: If shooting in low light, consider slower shutter speeds with steadying aids like a tripod.
-
ISO Settings:
-
Starting Point: ISO 400
-
Balance: Provides a balance between sensitivity and noise.
-
Adjustment: Increase ISO for deeper dives or murkier waters where ambient light is less.
Lighting Techniques
Good lighting can make or break your underwater photos. Here’s how to make the most of what’s available:
-
Natural Light:
- Timing: Plan your dives when the sun is at its peak (10 a.m. to 2 p.m.)
- Depth: Light diminishes with depth, so stay relatively shallow to maximize ambient light.
-
Artificial Lighting:
- Equipment: Use a strobe light or video light for deeper dives or dim conditions.
- Positioning: Position the light source off to the side to avoid backscatter.
- Diffusion: A diffused light source spreads light more evenly across your subject.
Composition Tips
Great composition can elevate your underwater images from mundane to mesmerizing. Here are a few tips:
-
Rule of Thirds:
- Use the rule of thirds to frame your shots. Imagine your frame split into nine equal quadrants and place points of interest, like a ship’s helm or a coral-encrusted anchor, along these lines or at their intersections.
-
Leading Lines:
- Shipwrecks are filled with natural lines formed by masts, beams, and the hull. Use these lines to guide the viewer’s eye through the image, creating a sense of depth and exploration.
-
Scale and Perspective:
-
Include a diver or marine life in your shots to provide a sense of scale. Showcasing their size can dramatically enhance the impact of your photos.
By mastering these settings and techniques, you'll be well-equipped to capture the mysterious allure and intricate details of underwater shipwrecks. Happy diving, and don’t forget to explore, experiment, and enjoy the journey!
Practical Tips for a Successful Dive
Dive Planning
Planning your dive is crucial for both your safety and getting the perfect shot. Start by researching your dive site thoroughly; know the depth, current conditions, and any potential hazards. A detailed dive plan will help you manage your time underwater effectively—remember, you are dealing with limited air.
Before you even hit the water, map out your route, especially if you’re diving in a large or complex shipwreck. Consider hiring a local guide who knows the ins and outs of the wreck. Also, inform someone on land about your dive plan. It’s an extra safety measure that can make a big difference.
Navigating Shipwrecks
Once you're in the water, navigating a shipwreck brings its own set of challenges. Visibility can be limited, and currents can be tricky. Always approach the wreck slowly and be mindful of your fins; you don’t want to stir up sediment and reduce visibility further.
For safety, always maintain situational awareness of your surroundings. Monitor your air supply, depth, and time constantly. Stick to the exterior of the wreck initially if you’re a beginner. Entering wrecks requires advanced training and carries higher risks.
Photographing shipwrecks also means dealing with tight spaces and potential hazards like sharp metal or fishing nets. A dive light is your best friend in these conditions; not only does it help your camera capture colors more vividly, but it also allows you to see and navigate better.
Currents can add another layer of difficulty. Learn the current patterns of your dive site, and plan your shots accordingly. Position yourself to let the current guide you, reducing your energy expenditure and making your dive smoother. If the current is strong, anchor yourself carefully to the wreck while photographing to prevent drift.
By following these dive planning and navigation tips, you’ll not only make your dives safer but also ensure you’re in the best position to capture awe-inspiring images of underwater shipwrecks. Happy diving!
Post-Dive Care for Your Equipment
After surfacing from an exhilarating dive, the work isn't over yet. Taking proper care of your underwater camera gear post-dive is crucial to ensure it serves you well for many more underwater adventures.
Cleaning and Maintaining Your Underwater Camera Lenses
Once you're back on dry land, your first priority should be rinsing your gear with fresh water. Saltwater can be particularly corrosive, and even a brief exposure can start to damage your equipment. Don't just dunk your gear; give it a thorough rinse to remove salt, sand, and any other debris.
Dry your equipment with a soft, lint-free cloth. Pay special attention to the lenses. A salty residue can easily scratch the glass when wiped. Instead, gently blot the lenses until they're dry. Avoid using paper towels or rough fabrics that can cause micro-abrasions.
Check your O-rings for any signs of wear and tear. These are the small rubber seals that keep water from entering your camera housing. A damaged O-ring can be the difference between a successful dive and a flooded camera. Rinse them, dry them, and apply a thin layer of silicone grease to keep them pliable and effective. Replace any O-rings that look worn out or cracked.
Storing Your Equipment
Proper storage is another key aspect of post-dive care. Avoid storing your camera gear in sunlight or hot areas, which can degrade rubber parts and affect the camera's internal components. A cool, dry place is ideal.
Disassemble your gear if possible. Remove batteries to prevent leakage and corrosion. If you have desiccant packs, place them in your camera housing to absorb any residual moisture.
For detailed maintenance practices, check out our comprehensive guide on SplashSpiral.
To sum it up, showing a little love to your underwater camera gear post-dive goes a long way. A good rinse, careful drying, and mindful storage can keep your equipment in top shape, ready for your next shipwreck adventure.
Editing Your Underwater Photos
Once you've surfaced from your dive and dried off, the next crucial step is editing your underwater photos. This part is key to transforming raw shots into breathtaking images. Here’s how you can take your photos from good to great with some basic editing techniques.
Basic Editing Techniques
-
Color Correction:
- Underwater images often have a blue or green cast due to light absorption and scattering.
- Tools like color balance and white balance sliders in editing software can help restore natural colors.
- Adjusting the red, green, and blue channels individually can also correct color imbalances.
-
Exposure Adjustment:
- Underwater environments can cause uneven lighting. Use exposure and brightness sliders to ensure your photo isn’t too dark or overly bright.
- Pay attention to the histogram to avoid clipping highlights and shadows.
-
Contrast and Clarity:
- Boosting contrast and clarity can bring out details in your shipwreck shots.
- Be subtle to avoid an unnatural look; a little goes a long way.
- Sharpness and Noise Reduction:
- Use sharpening tools to enhance details, but be cautious not to overdo it as it can introduce noise.
- Apply noise reduction if your images were taken at high ISO settings to remove unwanted graininess.
Recommended Software and Tools
-
Adobe Lightroom: Great for beginners due to its user-friendly interface and powerful editing capabilities. It offers presets that can speed up your workflow.
-
Photoshop: Provides advanced tools for more intricate edits. Ideal for professionals and those looking to refine their skills.
-
GIMP: A free alternative to Photoshop with robust features suitable for underwater photo editing.
- Luminar: Offers AI tools to enhance underwater photos quickly. Good for those wanting efficient results with minimal manual adjustments.
Using these techniques and tools, you can turn your underwater shipwreck shots into stunning visual stories. Editing is as much an art as taking the pictures themselves, so take your time to experiment and find what works best for you. Happy editing!
Housing Reviews and Recommendations
Overview of Popular Underwater Housing Options
When it comes to protecting your camera while exploring the depths, the right housing can make all the difference. Here’s a look at some popular underwater housing options, ideal for both beginners and seasoned divers.
Nauticam NA-D850
- Compatibility: Designed for Nikon D850 DSLR.
- Features:
- Rugged build
- User-friendly ergonomic controls
- Capable of withstanding depths up to 100 meters (328 feet)
- Customer Feedback:
- Praised for durability and intuitive design
- Superior sealing mechanisms prevent water ingress
Ikelite 200DLM/C
- Compatibility: Suitable for various mid-sized mirrorless cameras, such as the Canon EOS M50.
- Features:
- Transparent build for leak detection
- Lightweight and easy to handle
- Ergonomic grip for comfort
- Customer Feedback:
- Clear housing appreciated for peace of mind
- Efficient customer service noted
- Buttons can be stiff and require adjustment
SeaFrogs Salted Line A6xxx Series
- Compatibility: Perfect for Sony A6000, A6300, and A6500 mirrorless cameras.
- Features:
- Affordable yet reliable
- Supports depths up to 60 meters (196 feet)
- Multiple accessory ports
- Customer Feedback:
- Commended for versatility and strong basic features
- Occasional fogging issues reported, which can be mitigated with proper pre-dive preparation
Aquatech Elite II
- Compatibility: Built for Canon and Nikon DSLR cameras.
- Features:
- Robust and durable design
- Professional-grade performance
- High-quality seals and interchangeable ports
- Customer Feedback:
- Applauded for durability and material quality
- Reliable in extreme conditions
- Higher price point reflects professional-grade status
Brief Reviews and Customer Feedback
Choosing the right housing is critical, not just for protecting your camera, but for ensuring that all features remain accessible underwater. Here’s what some users have to say:
-
Nauticam NA-D850:
- Incredible build quality
- User-friendly controls
- Worth the investment for serious underwater photographers
-
Ikelite 200DLM/C:
- Transparency and seal checking ease favored
- Solid choice for beginners
- Stiff buttons can be a trade-off
-
SeaFrogs Salted Line A6xxx Series:
-
Popular among entry-level divers for cost-effectiveness and versatility
-
Fogging issues can be minimized with adequate prep
- Aquatech Elite II:
- Highly rated for rugged reliability and performance
- Price reflects professional-grade status
Conclusion
When selecting underwater housing, consider your:
- Camera model
- Diving conditions
- Budget
The right housing can significantly enhance your underwater photography experience by providing peace of mind and allowing full functionality of your camera.
Conclusion
In this guide, we've covered the essentials for capturing stunning images of shipwrecks underwater. From choosing the right equipment, including a reliable waterproof camera case, to understanding crucial camera settings and lighting techniques, each element plays a role in ensuring your shots are top-notch. We've also touched on essential diving gear and navigational tips to make your underwater experience both safe and productive.
Remember, successful underwater shipwreck photography isn't just about the gear; it's also about planning your dives, navigating the unique challenges underwater, and taking care of your equipment post-dive. With these practical tips and a bit of practice, you'll be well on your way to creating striking underwater photographs that tell the hidden tales of the deep.
So, grab your gear, plan your dives carefully, and start capturing those awe-inspiring shipwrecks. Happy diving!